


I have had requests for a while on simple sewing tutorials, and what better way to start than with one of the easiest DIY designs, a circle skirt.
Since the 1950’s when they first became popular, circle skirts have come in and out of fashion but seem to remain somewhat en vogue due to the simplicity with which they are made.
You don’t need a pattern for this, just follow the instructions and you will be wearing a gorgeous self creation in no time.
This is part one, in part two I’ll be inserting the zipper and finishing the garment.
You will need:
Materials
Materials
1.5 yards of light to medium weight fabric
Sewing thread
A large size snap button or hook and slide.
7″ zipper
Tools
Fabric scissors
Pins
Tailor’s chalk(optional, you can use pins)
Rulers or measuring Tape
Sewing machine
Measurements
Waist
Length of skirt
1. Your waist measurement is like the circumference of a circle. You will need the radius of that measurement for this exercise. Making sure that you add on an inch or two for the seam allowance, divide your measurement by 3.14, and then by 2. You will then have the radius.
For example, if your waist measurement is 29″ you will get a radius of 4.9″
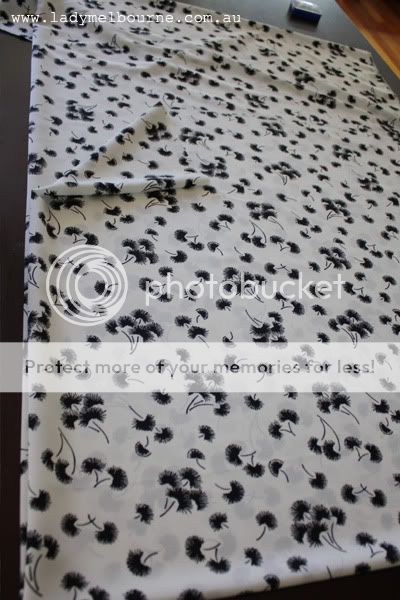
2. Folding
Fold your fabric in half horizontally, and then in half again vertically, as shown in the picture.
 3. Create your waist line.
From the corner fold, measure your radius measurement from the center, and then at various points until you get to the edges, or folds of the fabric. You can either use tailors chalk or pins to mark the fabric.

4. Measure the length of the skirt from the beginning of your radius measurement, as seen in the photo below. Make sure you measure around the angle as you did for the waistline so that your hemline is even! In this case, I have measured the length of the skirt as 25″ including seam allowance.

5. Cutting
Cut along your measured lines.
 5.a As the fabric has been folded twice, don’t forget to cut along the fold on one side as seen in the photo below, this will create the side seams.
 6. Pattern pieces
You should now have 2 identical pieces cut out as shown below.

7. Sew along the side seam, allowing 1/2″ for seam allowance.

8. Pinned at the side, this is what your skirt should now look like.
 I’ll add my disclaimer here that I have no professional training in pattern making or sewing. Mother Melbourne taught me to dress make when I was a teenager, and since then I have continued to learn from her and teach myself.
If you have anything to add that might be helpful to others, please leave a message in the comments section, I might even update the post if it’s useful.
In part two I will be adding the zip and finishing the garment.
Happy sewing!
LM
x
4 comments
[…] couple of years back I did a tutorial series on how to make a circle skirt ( see part one and part two) and used that basic idea here. No pattern needed as it was already in the shape of a […]
thanks… there are many other tutorials for circle skirts, but being a novice sewer I find them reallt confusing and full of jargon. This tutorial was really easy to understand and the pictures are really helpful.
Fabulous – this post inspired my outfit for a costume party I had over the weekend. Thank you for your help as always, Lady Melbourne! Xx
I am so glad that you put up this tutorial. I had to many questions but thanks to your directions I almost have enough faith to whip one of these babies up for myself. I have the fabric I cant wait.